The Ultimate Guide To Building A Home Gym For Every Budget
Working out at a regular gym simply isn’t the best option for everyone.
They can be crowded, difficult to get to reliably, and expensive.
The equipment can be hit or miss.
And sometimes you just don’t want to deal with the realities of working out with other people…
You know, having to wait endlessly for the squat rack, wipe up puddles of sweat before you can stomach using a piece of equipment, or just dealing with some of the less-than-savory people that can inhabit many weight rooms.
Well, if that sounds like you, then working out at home may be your best option.
However, unless you want to settle for doing some basic body weight exercises in your living room, then you are going to need to invest in some equipment.
As you probably already know, there are more options for home gym equipment than you could possibly wrap your head around.
Some of it is expensive, much of it is pretty useless – and most of these contraptions will likely end up doing little more than taking up space while slowly collecting dust.
So, to be clear here, there is a right way to build a home gym, and a wrong way to build a home gym.
In this article, I’m going to provide a step-by-step guide for building a quality home gym for every budget – and regardless of how much space you have available.
The Basics
First of all, though, I want to cover a few basic points.
These are some general rules that you should follow when considering what type of home gym you want to build.
Let’s quickly go through them.
Avoid All-In-One Expensive Machines
I know that Bowflex and other companies like them can put out some impressive looking equipment – but, generally speaking, none of this fancy looking stuff is a good investment for you to make.
These things often cost thousands of dollars, and sucker you into installment plans where you end up paying them off for months – if not years – like a second car.
Don’t buy into the infomercial hype here: these all-in-one behemoths are not the best bang for your buck.
They won’t provide the most effective workouts, and will likely go unused when you figure that out.
Don’t Turn Your House Into A Gym
Some of us have more space than others.
If you have a basement, a garage, or somewhere else out of the way that you can put workout equipment, then this doesn’t apply as much to you.
But if you’re not quite so lucky, then you should not make the mistake of thinking that your living room can double as a gym.
You don’t want to be tripping over weights all the time, so don’t get overzealous in your home gym planning and end up biting off more than you can chew, space-wise.
Basically, unless you have a completely separate room available for your workouts, then larger scale equipment like power racks should be seen as regrettably off limits.
Believe me, as someone who lives in New York City, I feel your pain…
Make It Somewhere You Want To Workout
Just as creating a motivating work space can help you get more done, making your exercise space inviting will only make you more inclined to actually use it.
This can mean putting inspiring pictures/posters on the walls, getting a stereo system, and preferably some lighting that makes you look your best.
OK, now that we’ve covered the basics, let’s get to the meat of the article…
I’m going to be outlining 3 different levels of home gyms that you can build for yourself – depending on both your budget and the amount of space you have available.
Home Gym Level 1: Resistance Bands
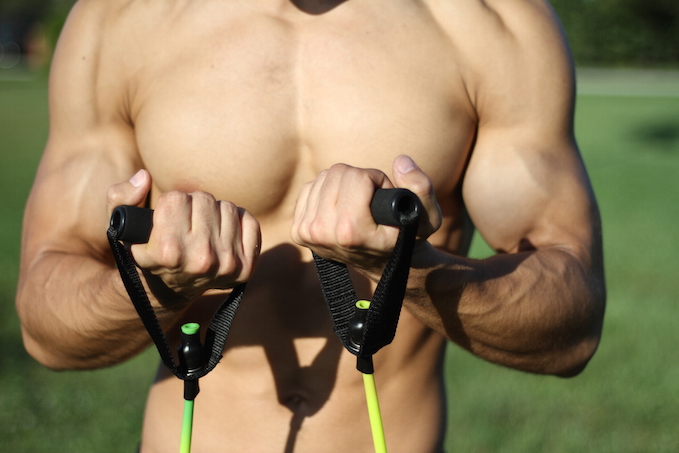
The easiest, lowest cost way to get started working out at home properly is with resistance bands.
And properly is the operative word here…
Sure, there are body weight exercises that you could do for free – or you could embrace fads like the 7 minute workout – but these options won’t allow you to build any real degree of muscle mass.
The bottom line is that if you want to build muscle properly, you need to be able to progressively increase the level of stress your muscles are under – either by varying the amount of resistance, number of reps, or both.
Resistance bands accomplish this fairly well – and sets with multiple levels of resistance are both widely available and very affordable.
You’ll typically get a variety of different bands in a set, and then you combine these different bands appropriately to increase the level of resistance, thus allowing for incremental progressions.
What’s more, you can train all of the major muscle groups using resistance bands – doing versions of squats, chest presses, shoulder presses, etc.
Finally, another major benefit of resistance bands is that you don’t need much space to train with them.
This means that if you don’t have a dedicated exercise room, then you can do your resistance band training in your living room or bed room.
Now the main downside of resistance bands is that they don’t have the same feel as working out with free weights…
So if you’re someone that really likes weight training – and enjoys heavy squatting, pressing, and deadlifting at your gym – then they may not provide a suitable replacement for you.
In addition, while there are a ton of different exercises that you can do with them, some of the movements are more awkward than others, and sometimes just don’t match their weight-based counterparts.
Pros: Very affordable, doesn’t require much space.
Cons: Lack the feel of free weights, some movements are more awkward than others.
Cost: $40-125 for a set of resistance bands (depending on the max level of resistance you want).
Who It’s Most Suitable For: Someone who is on a budget, doesn’t have much space for a home gym, is just starting out, or who travels a lot.
Recommended Equipment
If you decide to go this route, all you need to buy is a set of adjustable resistance bands.
We strongly recommend the ones from Bodylastics, since they are high quality, don’t tend to snap, and come with door anchors so that you can do a greater number of exercises.
There are a variety of different sets, but we’d recommend getting the 142 lb set if you’re just starting out, whereas if you’re more advanced then you should opt for the 202 lb or even the 404 lb set.
You can order each of these sets from Amazon directly here: (142 lb set, 202 lb set, 404 lb set).
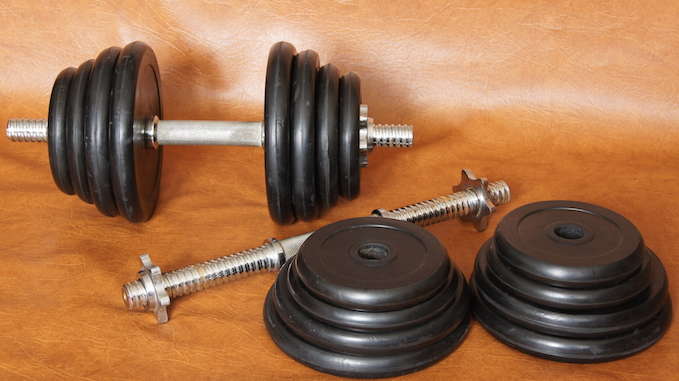
Home Gym Level 2: Adjustable Dumbbells & Adjustable Bench (Optional Pull-up Bar)
Now if you are looking for something that matches more of a traditional gym feel than resistance bands, this would be the most affordable, effective setup that I would recommend.
Basically, with just a set of adjustable dumbbells, an adjustable bench, and a pull-up bar, you can replicate a lot of the major movements that you’d be doing in the gym.
The big point to note here is that you need adjustable dumbbells – not just regular dumbbells.
Unless you have an entire set of regular dumbbells, chances are that you’ll only have a few different levels of weight – and probably nothing heavier than 50 pounds or so.
This isn’t very suitable for making consistent progress with your exercises, since you won’t be able to incrementally increase the level of resistance.
On the other hand, adjustable dumbbells allow you to move up weight in increments of 2.5-5 lbs, while still remaining incredibly space efficient.
In addition, an adjustable bench that allows for flat and incline angles will allow you to do a TON of movements without any extra equipment.
The last thing that I would strongly recommend getting to really round out this setup is a pull-up bar.
While this isn’t absolutely essential, the fact is that there are very few lat movements that you can do with dumbbells alone.
A pull-up bar allows you to add both chin-ups and pull-ups to your exercise routine, which means that you can really hit your lats properly.
Now let’s take a look at the potential downsides of this type of setup…
The biggest issue here is that you may find it hard to replicate the intensity of certain movements, namely squats and deadlifts, after you reach a certain level of strength and muscle development.
For awhile, you can certainly settle for dumbbell squat and deadlift variations – but at higher levels this becomes awkward and not really viable without more equipment.
In addition, you’ll need more available space than with resistance bands in order to properly accommodate the bench.
Pros: Reasonably priced, fairly space-efficient, and closer to a gym workout.
Cons: More expensive than resistance bands, difficult to replicate certain core movements at higher levels.
Cost: $400-900 (depending on max adjustable dumbbell weight and specific brand of bench).
Who It’s Most Suitable For: Someone with a moderate budget, a bit of available space, and who prefers a weight-based workout.
Recommended Equipment
As I mentioned before, at the bare minimum you need a set of adjustable dumbbells and a bench for this home workout setup.
In terms of adjustable dumbbells, I’d recommend either Powerblock Elite or Bowflex SelectTech.
The Bowflex dumbbells are arguably easier to hold, due to being less blocky in design, but lack the expandability of the Powerblocks.
You see, with Powerblocks you can purchase upgrades as you get stronger, without needing to buy a completely new set.
And with these upgrades, you can go as high as 175 lbs of weight for each dumbbell, which should definitely be more than enough weight for most people.
For this reason, Powerblocks would be our first pick, followed closely by the ones from Bowflex.
For your weight bench, you want something that is sturdy, stable, and doesn’t take up too much space.
For this reason, this adjustable bench from Body Solid would be my top pick.
However, since that costs over $200, if you’re on more of a budget I’d suggest going with this one from York Fitness, which you order from Amazon here for less than $100.
Finally, to complete this home gym setup, I would suggest getting a pull-up bar.
There are lots of different pull-up bars on the market, but you obviously want to get something from a trusted brand, so you don’t worry about it coming loose and collapsing on you while you’re using it!
My recommendation here would be the Iron Gym Total Upper Body Workout Bar.
It allows you to do pull-ups, chin-ups, hanging leg raises (for abs), as well as dips.
Compared to other pull-up bars, it is also very compact – so much so that you can fold it up and take it with you while traveling.
You can order the Iron Gym Workout Bar from Amazon here for about $22.
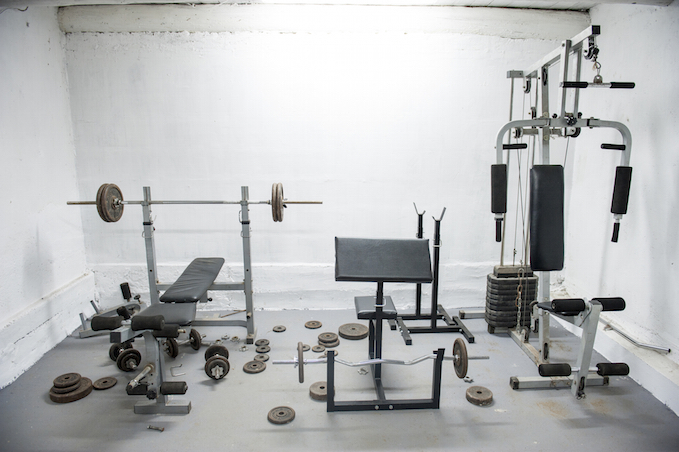
Home Gym Level 3: Power Rack, Barbell Set & Adjustable Bench (Optional Adjustable Dumbbells)
I’ve saved the best for last…
Let me be clear, if you have both the space and the budget, this is the type of home gym setup that you should go for.
In my opinion, you won’t be making any sacrifices with a configuration like this, and won’t need to worry about missing out on anything from a regular gym (aside from the chit chat).
Basically, this home gym setup includes 3 specific components: a power rack, a barbell with weight plates, and an adjustable bench.
Let’s go through each of these briefly.
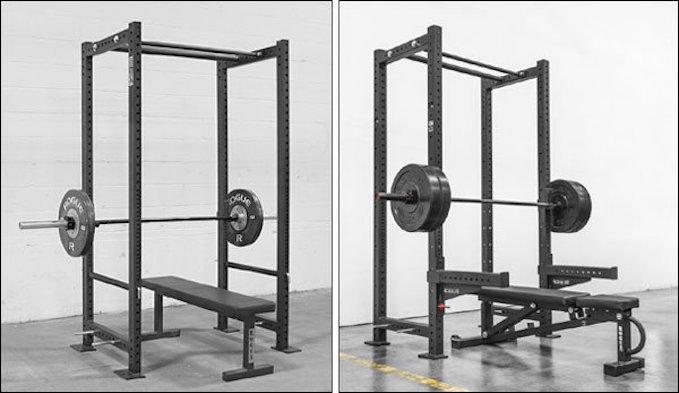
First of all, if you haven’t seen one before, a power rack is the ultimate piece of equipment for doing barbell exercises.
It allows you to do squats, bench presses, deadlifts, rows, military presses, etc.
You can even do bicep curls in your home gym power rack!
Jokes aside, it is a core piece of equipment, so you want to make sure you get the right one (I’ll cover this in a second).
In fact, some of the better power racks also have both pull-up and dip bars, so that you really won’t be missing out on anything.
Next up, you’ll need a barbell with weight plates.
Not too much more to say about that – aside from the fact that you want to make sure you get an olympic bar, enough weight to be challenging for your harder exercises, and possibly some bumper plates.
You’ll also need an adjustable bench – which allows for flat, incline and upright angles – but I’ve already covered that above, so I won’t repeat myself here.
Finally, if you really want to have the ultimate home gym setup, and budget is less of an issue for you, then you should opt to get a set of adjustable dumbbells as well – either the Powerblocks or Bowflex SelectTech dumbbells that I mentioned above.
At this point, I should probably point out the potential negatives with this type of home gym configuration.
Firstly, it is expensive to build. We’re talking over $1000 here realistically if you want high-quality equipment.
Secondly, you’ll need a lot of space here. To be honest, you probably shouldn’t even consider getting a power rack unless you live in a house where you have a separate room designated as your workout room, or a basement/garage that you can use for this.
If you live in an apartment building, as I do, this type of setup is unfortunately just a pipe dream. Even if you have the space, you’ll likely get complaints from your downstairs neighbors due to the heavy weights slamming onto the floor.
Pros: As good as a gym, if not better, but all in the comfort of your home.
Cons: Expensive and requires quite a bit of space.
Cost: $1000-2000+ (depending on the specific brand of power rack, weights, and adjustable bench you get).
Who It’s Most Suitable For: Someone who wants the best type of home gym setup, and has both the budget and the space to allow for it.
Recommended Equipment
When shopping for a power rack, there are 4 major considerations: cost, size, build quality, and whether it needs to be bolted to the floor or not.
Given all of this, I have 2 recommendations for a power rack – and which one you decide on largely depends on the last point.
If you are looking for a reasonably priced, space-efficient power rack, which doesn’t need to be bolted to the floor, then I would strongly recommend the Powertec Power Rack, which you can order from Amazon here for $730.
It also comes with both a dip and pull-up bar built into it, and can be expanded with a whole range of other powertec accessories.
The other option is the Rogue Fitness R3 Power Rack.
It is about the same price, a bit bigger, and is considered the crème de la crème of home gym power racks.
However, unlike the Powertec rack, it needs to be bolted to the floor, which is definitely a consideration.
Another advantage of the Rogue rack is that it is made with what is known as the ‘west side hole pattern’.
This means that you would be able to adjust both the pins and the safety bar to exactly the right levels for your height and arm length when you bench press, squat, etc. A nice touch, but certainly not essential.
You can order the R3 Power Rack directly from Rogue Fitness for $700 here.
After you’ve decided on a power rack, you’re going to need to get yourself a barbell set.
In terms of the bar itself, as I mentioned before, you are going to want to get yourself an olympic bar – which is a standard length of 7 ft and a standard weight of 45 lbs.
There are lots of different olympic bars the market, but my two recommendations would be the Body Solid Olympic Bar (which you can order from Amazon for $112 here), or the more expensive Rogue Fitness Ohio Bar (which you can order from their website for $282 here).
Next up, you need weight plates – and again, you’ll find that there are a lot of potential options.
Regular weight plates can be made of rubber or metal, and then there are what’s known as ‘bumper plates’ that make less noise if you’re doing heavy deadlifting or olympic lifting.
For most people, regular olympic weight plates are sufficient (at least to start). You should look to start off with at least 300 lbs of weight, and can then purchase more plates as needed.
This means getting at least 4 45 lb plates, 2 25 lb plates, 2 10 lb plates, 2 5 lb plates, and 2 2.5 lb plates.
Then, as you need them, you can order additional 45 lb plates, and be able to adjust to every increment as you increase weight in your exercises, which is the most cost effective way of doing it.
In terms of brands, I’d recommend going with either the Body Solid Olympic Plates or the Rogue Fitness Olympic Plates.
You are paying roughly $1 per pound in both cases, but it is worth it as a long-term investment in your ultimate home gym.
Finally, you need to get yourself an adjustable bench. As I discussed before, I’d go with the one from Body Solid or York Fitness, depending on your budget.
And, of course, if you really want to complete the setup – and money isn’t a big factor for you – you should order a set of adjustable dumbbells as well (either the Powerblocks or the Bowflex SelectTech dumbbells, as I discussed before).
Home Gym Extras
OK, so now that we’ve covered the 3 different home gym setups that I would recommend, there are a few additional pieces of equipment that you might want to consider purchasing.
I’ll briefly go through each of them, and which brands I suggest going with.
Flooring
If noise is a concern, or you just want to protect your floors, then you might want to invest in some proper home gym flooring.
This is most important if you’re doing heavy barbell exercises, like deadlifts, but given that it doesn’t cost very much you may want to get some even if you just have a more basic dumbbell setup.
I’d recommend going with the heavy duty, interlocking flooring from CAP Barbell. It is inexpensive, and easy to put together.
You can order as much as you need from Amazon here.
Ab Wheel
These little wheels are a cheap and effective way to get a good ab workout at home.
Frankly, it’s one of my favorite pieces of ab equipment – as simple as it is.
I’d recommend getting this one from Valeo, which you can order from Amazon here for about $12.
Assistance Bands
If you are doing one of the home workouts that involves pull-ups or chin-ups, but can’t do them for reps with your bodyweight yet, then assistance bands are a good tool to have in your arsenal.
You can use these to progressively decrease the amount of assistance on your pull-ups, until you are able to do them properly without any assistance.
I’d recommend getting this set of 2 assistance bands from Body Bands, which you can order from Amazon here for $35.
Dip Belt
On the other end of the spectrum, once dips and pull-ups become too easy with just your body weight, then it’s time to get yourself a dip belt.
This allows you to add additional weight, using either weight plates or a dumbbell.
I’d recommend getting this leather dip belt from Harbinger, which you can order from Amazon here for $35.
What About Cardio?
Now so far everything that I’ve discussed about building a home gym is entirely to do with strength training.
But I’m sure that some of you want to be doing cardio too, right?
Well, in terms of doing cardio at home, there are several different options that I’d recommend considering – again, depending on your budget and space constraints.
Jump Rope
This is generally what I recommend for my clients if they are looking to do cardio at home.
Jumping rope is deceptively challenging, and works great for HIIT-style cardio workouts.
In addition, jump ropes are cheap and don’t require very much space compared to other options.
I’d recommend getting the heavy duty jump rope set from Crossrope.
I like it because it comes with both speed ropes and heavier ropes, giving you a lot of options.
You can order a Crossrope set from Amazon here for $54.
Exercise Bike
If you have a bit more space, and a larger budget, then you can consider getting yourself an exercise bike.
I like exercise bikes since they are low impact, so it won’t wear out your knee joints like some other forms of cardio.
I’d recommend either the upright or recumbent models from Schwinn.
They’ll set you back a few hundred bucks, but they are high quality and should last for years even with heavy use.
Vertical Climber
Now I’d venture to say that you may not have heard of this one before…
Vertical climbers are not as well known as the other options, but they provide an incredible workout (in terms of calories burned).
What’s more, they don’t take as much space as exercise bikes, since they have a more vertical design.
I’d recommend the Maxi Climber, which you can order from Amazon here for $230.
In Summary
We covered a lot in this article.
However, I wanted to be as thorough as possible, in the hope that you can use this information to create the perfect home gym setup for yourself.
So no excuses!
I’ve literally laid out options for every budget. From just $40 on the low end to $2000 on the high end.
Not to mention options for every home size – whether you’re living in a one bedroom apartment or have an entire room dedicated to working out.
Now all you have to do is order the equipment you need, set everything up, and get started…
And of course cancel that gym membership that you’ll no longer need while you’re at it.